Mobula 7 HD Toothpick Conversion - "New" build

Working my way up on the drone building world… lol

First there was the Meteor 75 frame swap, then the Crux 3 canopy and antenna upgrades, now working on a bit more challenging operation, the conversion of a Mobula 7 HD into a Toothpick!

Whilst browsing UnmannedTech’s bargain bin I saw one which was missing a motor and other possible problems and had the idea of converting that into a Toothpick with a HD DVR (Caddx Turtle v2).

Fast forward some days, I now have almost everything I need for the build, missing the motors, but have decided to start putting things together. I browsed thingigverse for a suitable canopy and once I found one, had the help of @Njoro to print it out along with some other required parts.

I received the prints today by mail and was eager to see how everything looks on the frame It’s not all on the frame yet, but at least now I have a better idea of how things might/should work all together. It also has given me a chance to identify a major pain, which is the diamond vtx that came on the drone, this thing is really getting in the way of the build, so I might need to discard it for a smaller solution (might do a swap with the Meteor75 vtx , but not sure yet).

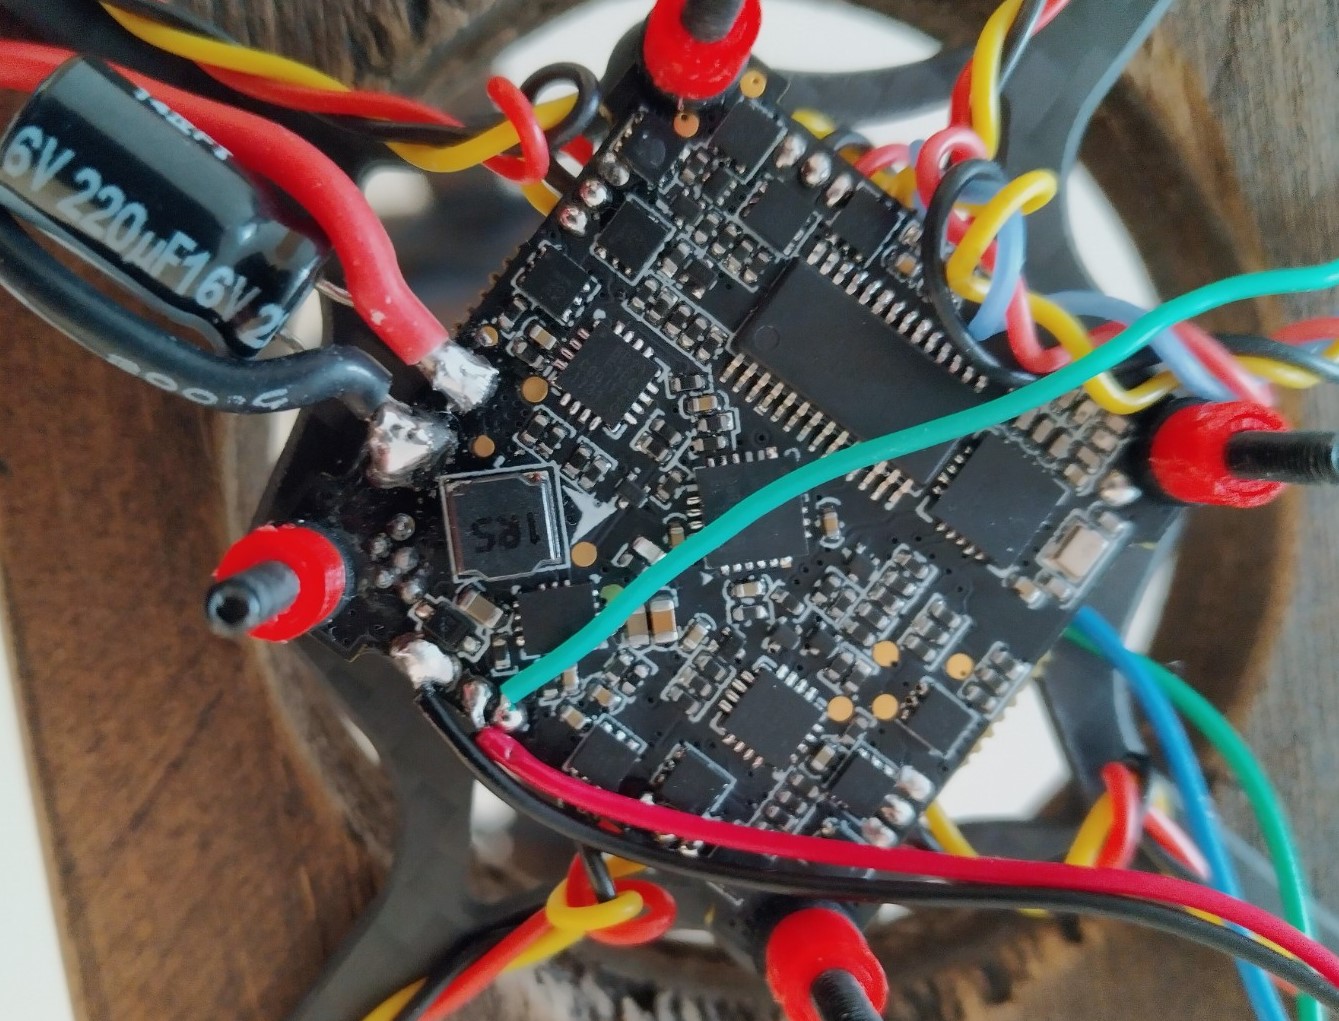
  • Actually the big challenge on this build is the fact that the caddx turtle dvr board is a 20x20 mount, hence the height of the stack* (its fram - fc - adapter plate - dvr - vtx* - canopy) *ideally it should be a small one which I can just chuck inside the canopy

I have not added the FC on the stack bc as it is now it doesn’t fit. The power cable is soldered right next to the USB plug on the bottom side, and this is keeping it from fitting on the frame (its a crux3 fram). But the overall hight should not change with it added, since I left the FC gummies on the stack as a place holder…

Well, enough chat… here is what it looks so far:


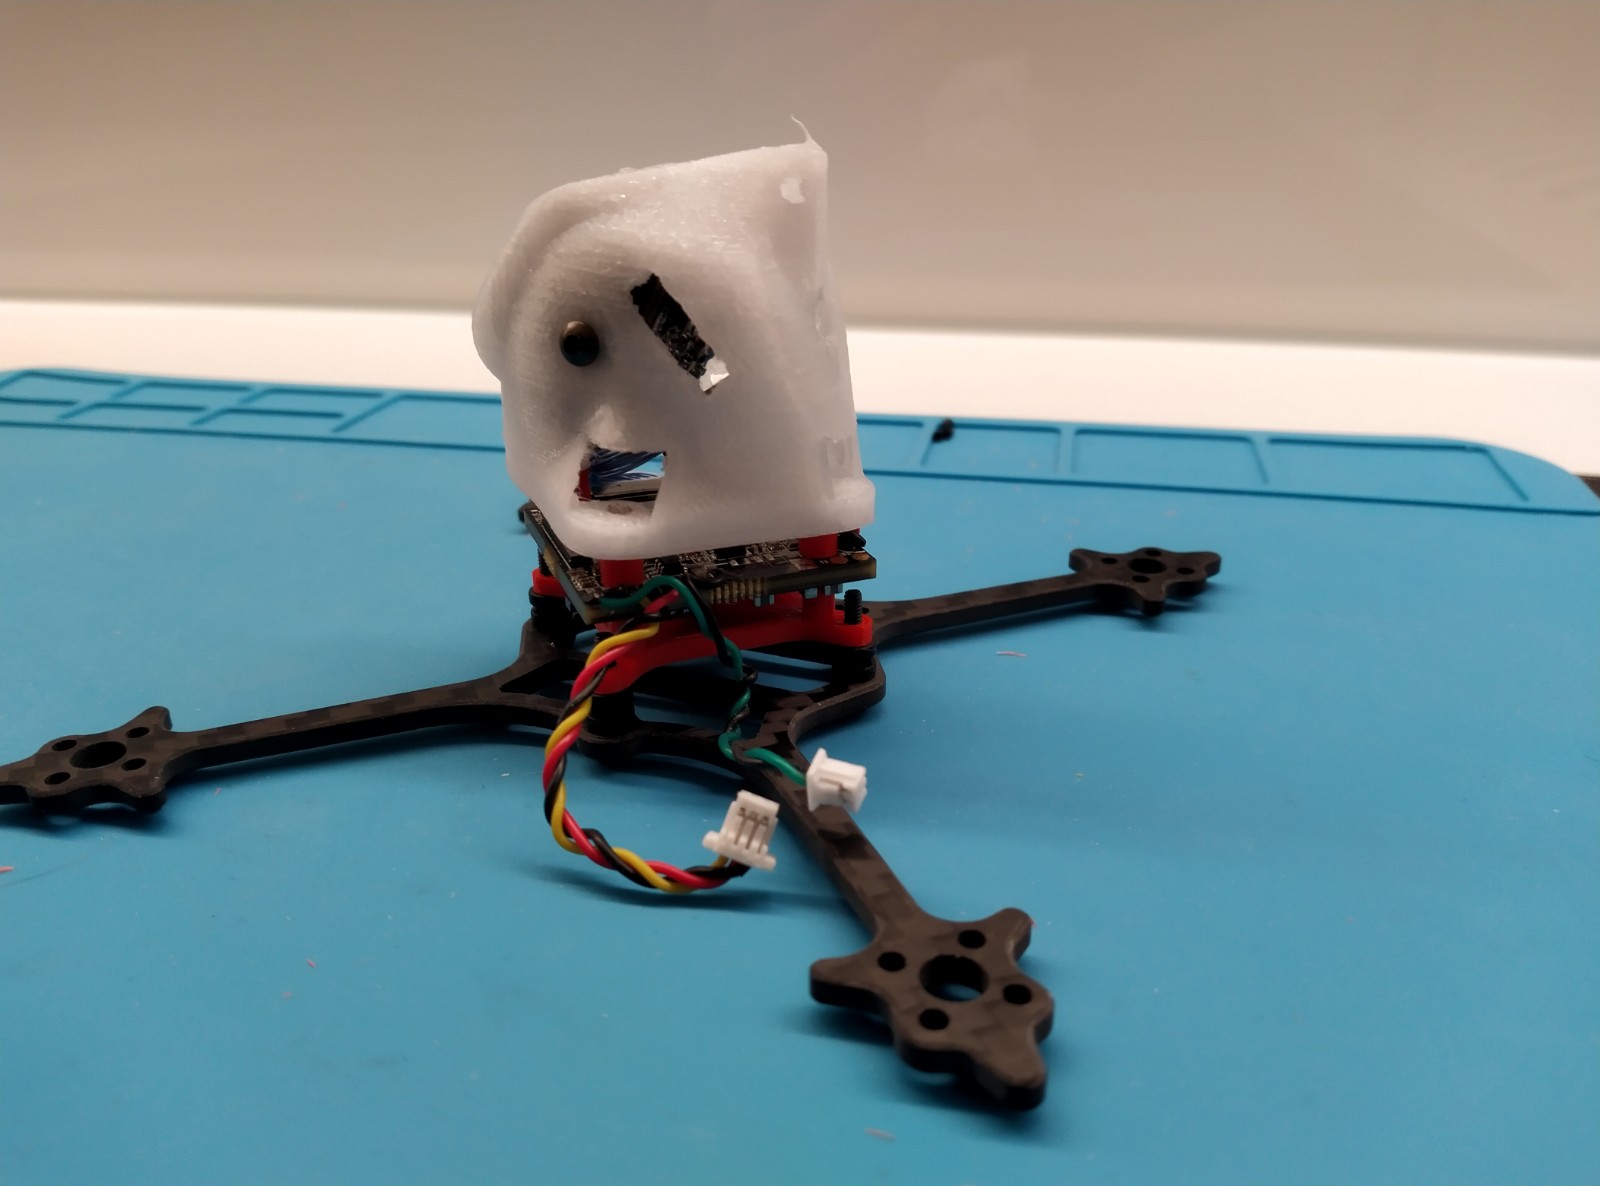
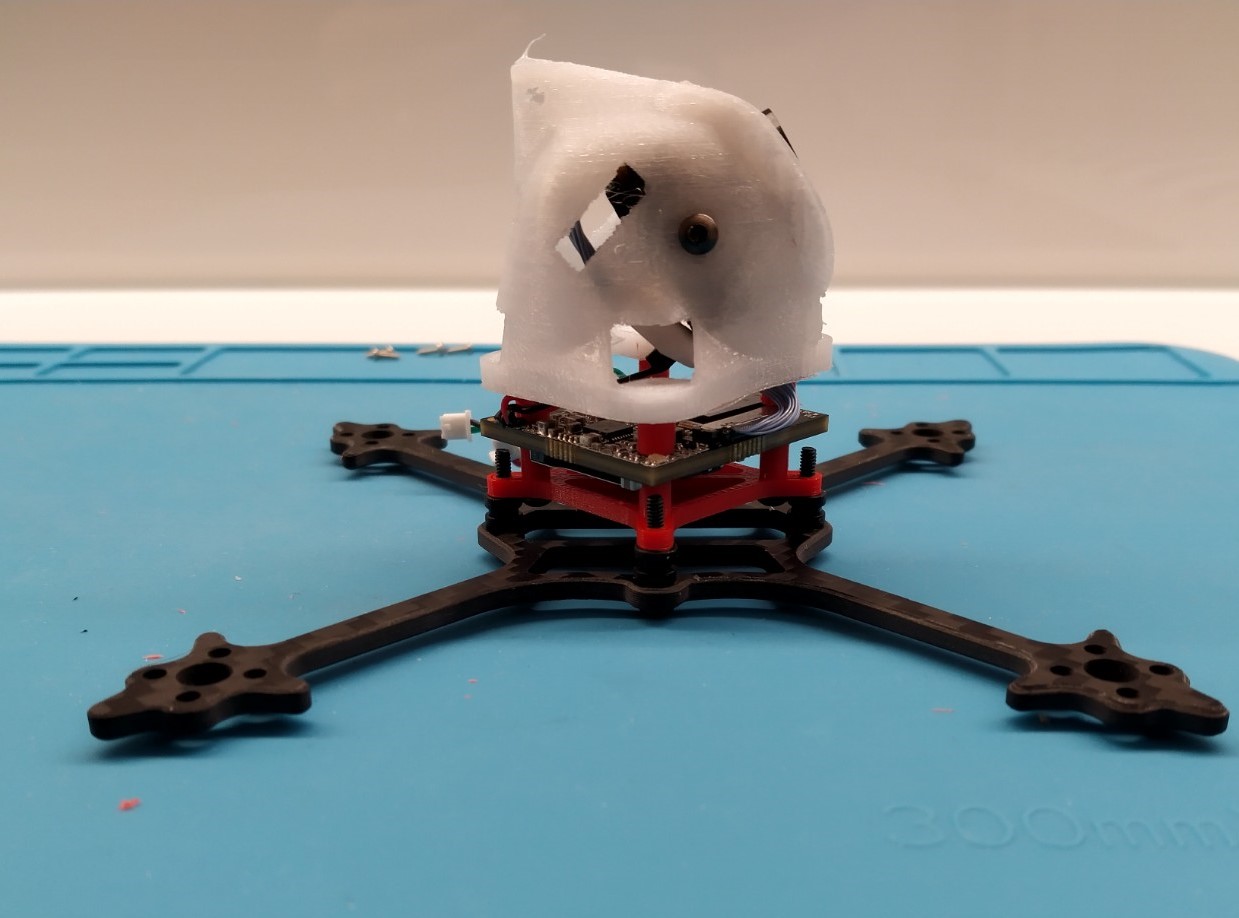
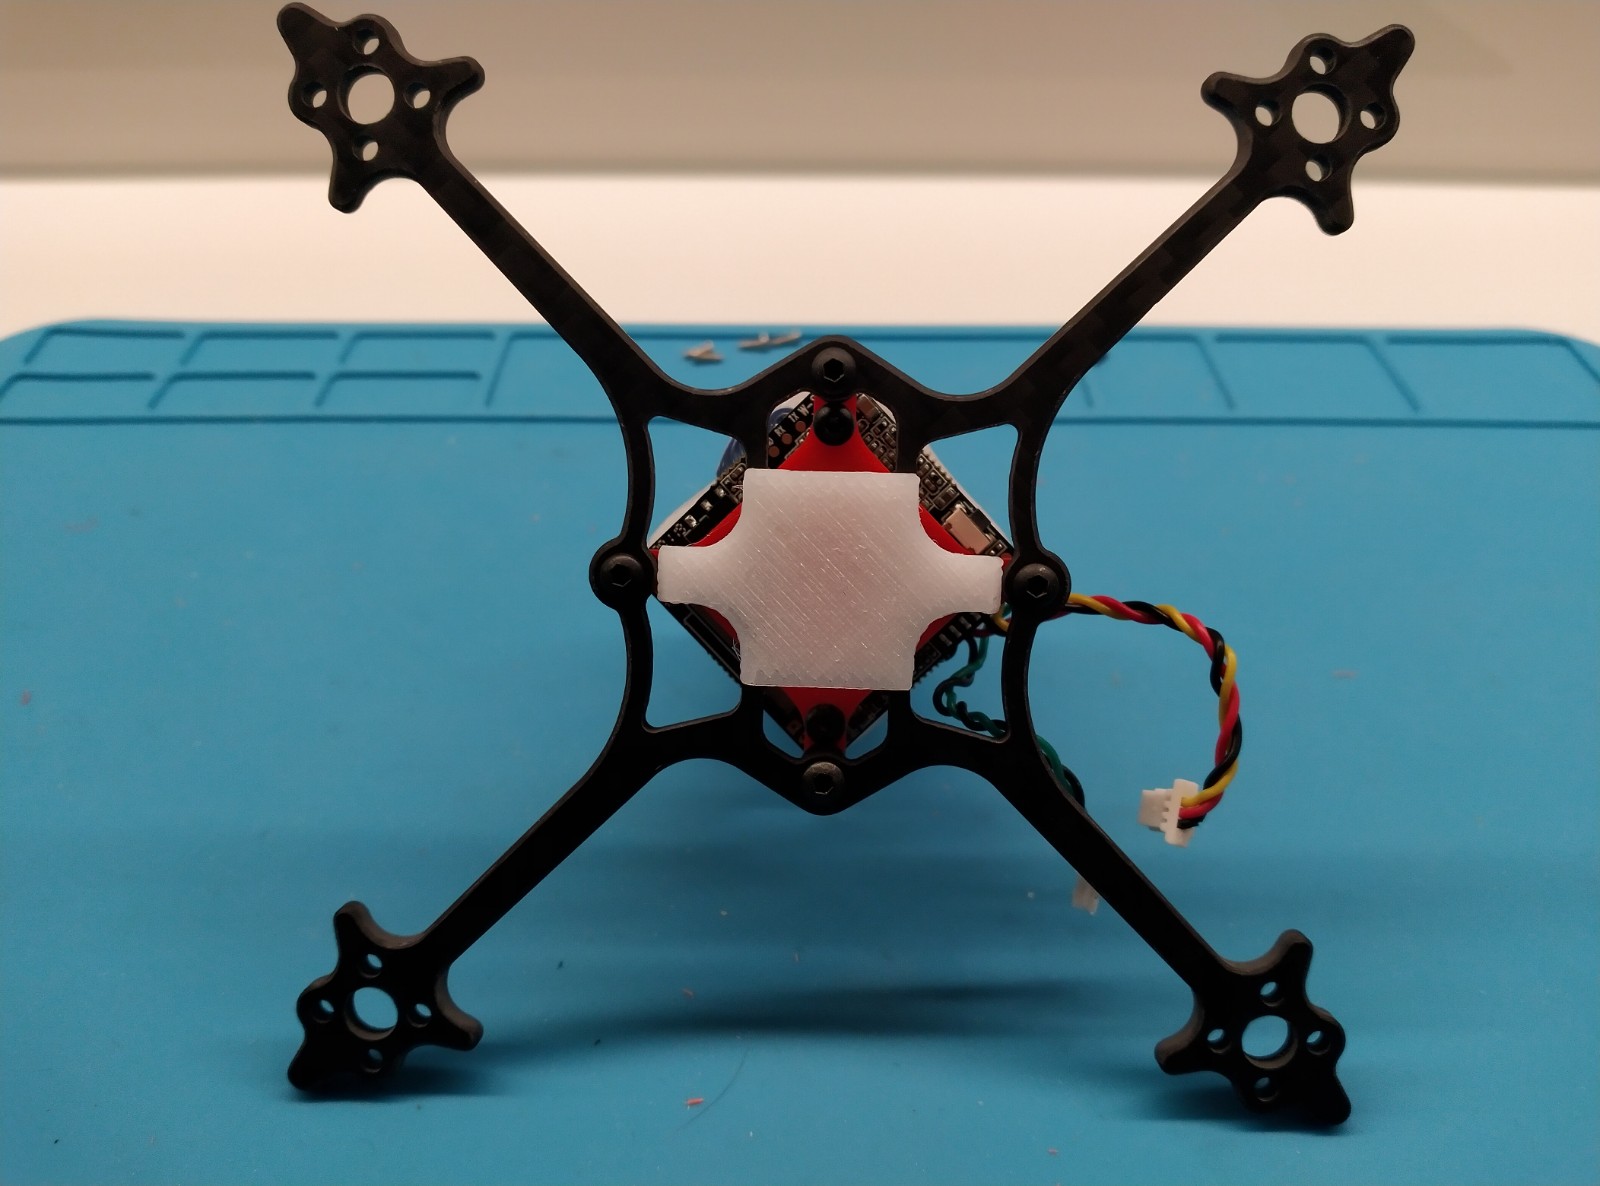
The red bits in the middle of the stack, plus the white canopy and battery plate, are the goodies @Njoro printed out for me ( :+1: ) I added the picture with the battery pad just so that he could see how it looks on the frame (fitted like a glove btw).

Motors are coming from China, who knows when that will arrive. I got some dirt cheap 1104 4300kv, same as the BabyApes, and initially I’ll run it on 2s. I will most likely settle on the gf3018 bi-blades, but will try out the 3016 tri-blades, and a 25xx tri-blade as well… The esc on this board is only 5a, so I’ll have to be very cautious setting up.
Until the motors arrive I have some solder work to do as well; de-solder battery lead, the motor plugs, and the led. Will add an elrs rx and a battery lead with a cap on… Also, since I’ll be flying this on 2s at first, I’ll put together a couple of adapters from bt2.0 to xt30 and gnb27 to xt30, this way I don’t need to buy more batteries or charger for the time being… lol times require me to be cheap…

That’s it for now, just wanted to share the experience with you all…

2 Likes

Happy it all fits, having never built one I just had no idea how the battery holder would fit……you live and learn….

1 Like

I’m not liking the height of this and might eventually change the project a bit and remove the turtle system and just go with a regular camera and vtx combo. It also adds a lot of weight to the build bc of the additional screws and adapter… But I’ll try to fly with this setup first before deciding…

Not in the mood of soldering today but I did remember I had another frame laying around which could be used for the build.
Dug it up from a dark corner and put everything on to it, minus the motors… This should be the final stack format should I keep the diamond VTX. All I need to sort out a bit better is the spacing between the canopy and Turtle board, as well as the VTX and adapter plate…
Also put everything on the scale and the AUW should be around 95g, +/- a few grams depending on the batteries being use.
If used with the 3018, as per motor chart, on 2s I’ll be getting around 5:1 ratio and on 3s around 7.5:1. On 3s it seems to be performing closer to what is expected of this type of class…

Here’s how it looks on the other frame:


So, I received the motors yesterday evening and was pretty stocked to get things moving on the project.

I spent most of the day today preparing the FC; adjusting power lead positioning, adding cap, removing motor plugs, fixing vtx solder connection points removing the stock rx antenna, and adding the EP2 rx (I’m not an expert on soldering and these pads ar all tiny).

Tomorrow I would connect the motors in and test the Amp drawn with a few props I had thought of, and then job done. All left would be to wait for the new canopy which is on its way on the mail…

However, I had a little mishap with the TX2 pad and its gone, well, technically its not gone, its soldered to the cable, but no longer part of the FC…sadly

I was working on positioning the cables after I soldered the tx/rx couple and it came off when I tried to bend the cable a little.

The board theoretically should still work, its connecting to BF as it was before, but since I only have ELRS, I have no way of connecting to it now.

I will still plug in at least one motor and test the amp draw, but I don’t know what I’ll do now. The options are to either buy another FC or buy a 4 in 1 tx module. Don’t know which or when this will happen though…

I’m pretty sure there is no salvation for the pad issue, but I got ask… Is there any chance of getting it fixed?

This board only has uart 1 and 2, in which TX1 is already in use for the vtx, so I can’t use that instead, unless someone has a workaround which would allow me to use it…

It is possible to solder to the relevant pin on the main processor. But it’s very difficult.
Is there an led pad that you can remap?

Not sure… this is the board diagram:

Don’t know if the “LED Strip” pad is what you mean…

Yes. Led strip can be remapped as an extra uart. It’s not too hard to do in the cli. Have a read of this:

1 Like

Ow…this is an unexpected turn of events… If indeed possible it would save my project. It already relieved some of the stress from fucking it up… lo

Just did the remap on the CLI, also, for being on the safe side, I disabled the TX2 which is dead… The position of the LED_strip pad is actually much better than the tx2 one, wished there was another on the border which I could swap to as well…

I’ll test it up tomorrow and post back with results.

I had no idea this was a thing, thank you so much for pointing it out!!!

Ok, gone through a bit since last post.

I was able to get the EP2 to work using RX1/TX1 and also wired the smartaudio cable form the VTX into the LED_STRIP pad, which is now configured as a softserial TX.
Had a bit of issues getting the smartaudio to work but I managed to solve after I flashed BF 4.4 again with the AKK (SA FIX) option, and manually set on cli the vtxtable powerlevels/values/labels.

The camera is not showing images anymore, it just loads into the yellow screen for now. Wil do more tests on that and hopefully it works still…

Motors will be soldered next, and amp draw tests with some props will follow…

I always fancied a crux the YouTube vid I watched showed it as rapid :+1:t3:

Some more updates on today…

The camera wasn’t playing nice and no matter what it was stubborn on its yellow screen… No problem, I removed the camera sensor and put it in the oven for about 8 minutes at 185c, what do you know, the hack works… Got image back… lol got love these simple hacks eh…

Not sure if its going to last or not, will need a lot more tests to make sure its flyable, otherwise I’ll buy a cheap camera and slap it in there…

Finally soldered the motors!!! FC and motors are currently on the frame. Did some very basic tests with no props, everything seems to work as intended. Only needed to configure the orientation, apart from that all good it seems. Amp draw with no props is quite low, at full throttle on BF motors page, I’m getting about 5 amp in total, at full motor output. So looking good for now I guess.

Did some amp draw with prop on. Tested just in one motor as I didn’t feel like struggling with prop changes on all 4.
100% motor output - @ full throttle on the slider in BF Motors tab
2x1s Betafpv battery 450mAh HV 30C / 2x1s The FPV battery 450mAh HV 80C
GF3018 bi-blade - about 3.4 / about 3.65
GF3016 tri-blade - about 3.7 / about 4.15
HQ T3x2 bi-blade - about 3.75 / about 4.25

For comparison, I tested my crux3 1s (also runs on a 5a esc)
100% motor output - @ full throttle on the slider in BF Motors tab
1s The FPV battery 450mAh HV 80C
GF3018 bi-blade - about 4.8
GF3016 tri-blade - about 5.2 (when it went above 5 I stopped and didn’t dare try going further, but I’'m sure it hit around 5.2)
HQ T3x2 bi-blade - will test later, but going from the tests on the other motor, it should probably hit above 5.

So if I ever want to fly those 3016, and probably the HQ, on the crux I’ll have to scale down the motor output. Might try it out some day.

The results for the motor came very close to what was expected, which is good bc I don’t have to worry about running on 2s and might event get away with 3s on the 3018’s without a motor cap, although I’ll probably have to for the other props. I’ll cross that bridge when it comes.
For now, I’ll stick with 2s and probably start with the 3016’s and see how that performs.

Some pictures:


3 Likes

Some progress at last…

Today I received a spare turtle unit which was purchased used and was able to merge with my and get it working. With that out of the way, I proceeded to put everything together.
I had some problems with the second canopy I had printed out, the camera wouldn’t fit properly seems like a design flaw to me, so I decided to go back to the previous version (the big heavy stack)…
I put everything together and did a quick hover test indoors and everything worked which led me to a couple of observations from the start…

  • The weight seems a bit much for the motors, its auw is 94g and with the theoretical motor thrust of 120g on 2s, its currently sitting at a 5:1 ratio. I might add some curves on the throttle and see if it feels a bit better, but as it is now hover is about mid throttle, thats too much.
  • The vtx is a bit erratic. Seems like it needs to warm up a bit to get its shit together, so this might be something I need to change soon.

Here are some pics of what it looks like currently


Still on the lookout for a regular analog camera to have as a backup or even have it as the main one…

As soon as weather gets a bit less bad I’ll do some tests outside with the current setup. I will later proceed with flashing bluejay in the hopes of making a better setup. Also, depending how long it takes to get the additional camera, I might do a test with the one from my crux and check how better it flies shaving some weight off…

Will share results after more tests…

1 Like

If you trash your camera, pm me :+1:
Not being funny, but we all have backup kit in case we need it. But if you really need something, we can help out :+1:

Tks dude…

I don’t feel confident with this setup to do anything crazy, hence the idea of having a normal analog camera to be able to swap with this one for when I fly more aggressively (ie crashing when trying new things out).

2 Likes

The weather wasn’t as bad today (no rain and very light wind), so I took it outside for some tests.

I added a bit of throttle curve to the model profile on the radio and it was a bit better than what I noticed previously on the hover test, however it does still feel heavy from the little I was able to fly it.

Something is going on with the VTX , it seems like its not transmitting to the frequency its supposed to and also once I find a working one by manually scanning, I breaks off really fast after just a couple of meters. Also it seems like it needs to warm up a bit before starting to transmit. I plug in the battery and image and OSD pops up for a fraction of a second, then it goes to static for a bit and only then it seems to start transmitting, albeit never on the set frequency
Not sure if the unit itself is faulty, if this could be wire connection or even a configuration problem… The connections seem fine, once I get image its pretty stable and crisp, only when I move further a bit it gets bad. I’ve searched and found the original vtx configuration json file and have applied that, and also applied it manually on CLI (when I was getting the problem with it not changing power/smartaudio).
Any tips of how to go about with troubleshooting this before throwing in the towel and getting a new unit?

Whats the VTX? Have you got it connected via smart audio, and is BF configured to change the channel? That’d be where I’d first look. The “warming up” is strange, this happens on bench? I’d think it’s connections to be checked there first!

Its the HM Whoop VTX (old stuff)
Its connected on smartaudio, when I change settings via BF or OSD I can see the changes on the VTX led, so I guess thats working.
The warming up thing happens o both USB and lipo connections…