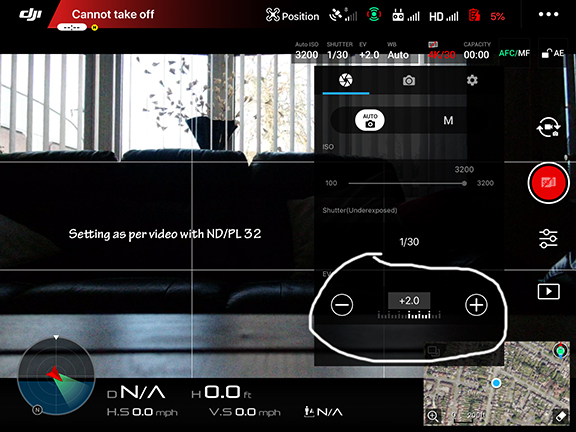
Had another attempt with my M2Z using ND/PL filter and just can’t seem to get it right the sky should be a nice blue but appears washed out any tips on using them please? on this shoot I used ND/PL 32
I know there is a lot to improve on including the editing but this forum is great for the learning curve the recent weather has not helped only been out a few times since Christmas.
1 Like
It may not be the nd filters it still looks bright have you got auto white balance and what are you recording in Dlog? Natural? Check these setting
Nd 32 would be very dark something else is countering the filter
What is your f stop spec shows 2.8-11/ EV ? ±3? All can effect the image
2 Likes
Try setting the exposure manually, I was having the issue when doing some panos so set the Iso and exposure manually, ended up with much better results.
2 Likes
Yes much like what @sparkman999 is saying. The image does look very bright considering theres a ND 32 in use.
Definitely have a look at those settings. Be interested to know what the camera settings were . 
1 Like
May sound a stupid question,
did you rotate the filter to give the best effect for the polarization?.
1 Like
A couple of thoughts. I’m assuming it’s a circular polarizer (if not, you can ignore point 1)
-
filter orientation - if you look at some of your shots the sky is darker in the top left than the top right. This suggests that you may not have the filter lined up correctly
-
as others have said it should be way darker. Either your white balance or exposure is compensating for the filter. A ND 32 would be used on a really, really bright day such as sunny day in a ski resort with all the glare off the snow. I use either a 4, 8, or 16
1 Like
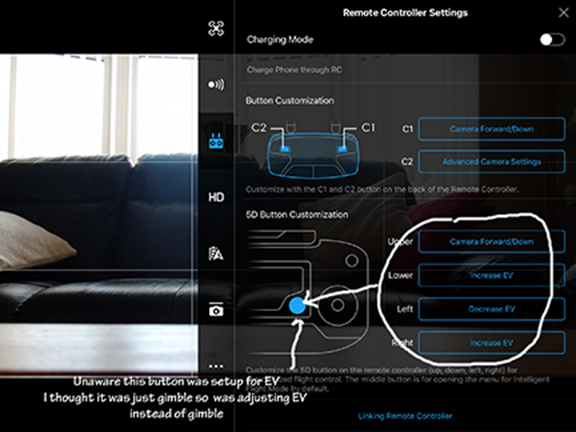
Thank you everyone for pointing me in the right direction after having a look at all your suggestions I think I have found the issue. First I did not realise that rotating the filter made a difference so that is something that I will now take on board. Second I was unaware that the small button next to RHS stick was adjusting the EV so instead of what I though was moving gimbal it was adjusting EV.
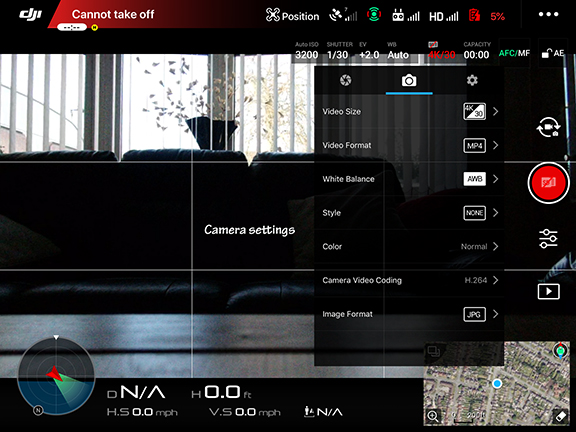
The screen shots show the settings at time of recording footage this has been a great lesson and will now check all settings before flight.
again many thanks

IF, i use a polarizing filter, i always check (before i start the motors) the best orientation of the filter to give the best results in the area that i am going to fly.
I realize that this is not always practicable on the ground, but, it does give a fair representation of the likely results of what the drone sees.
Just my five pence worth.
Possibly a lesson for people who are in the mind of buying filters,
Buy the type that you can rotate.
1 Like
A problem shared, is a problem halved.
Glad to be able to advise.
1 Like
You might find this helpful. It’s for the Air but the principle is exactly the same:
3 Likes
Truth is guys I will probably need your help often. I spent 33 years in the photo industry working mainly for the big yellow giant Kodak, traveled a lot installing 1 hour photo kiosks in Boots & SupaSnaps remember getting your film developed in 1 hour, I would teach / train newcomers to the industry in the fundamentals of photofinishing, in the early 90’s I worked on the development of the Photo CD and Picture disk I was often approached by competitors to work for them in order that they could get the secrets…why am I telling you this, well I am finding it a little embarrassing asking some of these questions when I had a wealth of experience in photographic industry however in 2012 a stroke put paid to a lot of that knowledge hence I struggle to remember and find it very frustrating. I know you guys on here don’t judge but I feel I need to explain for my own peace of mind thanks again
4 Likes
No explanation needed, when life deals you a bad deal such as that, you are not being judged by any of us members in any way.
We are here to help one another, in anyway possible.
What one person does not know, you can be sure someone else will no doubt come forward with a solution.
Our hobby of flying drones is progressive, every update changes things in some way,
things not everybody is aware of when they have updated their drone.
We bring things it to peoples attention, not to be big headed, but to be of help to everyone on our Forum.
It is a massive learning curve for members who have not had the experience that others may have had, we/I am only to willing to pass on that experience ,in anyway we can.
PLEASE, don’t be afraid to ask about anything, and again, we do not judge anybody.
This applies to ANY member on our Great GADC Forum.
Keep up the great flying, and enjoy it !!.
5 Likes
Cheers Chris I have taken up this pastime to keep my self active but not finding it easy but with GADC forum it should make it easier
3 Likes
Hey there Gary
Just having a look at the settings from the top photo. You were taking some video there, I’d maybe look at the shutter speed. as being little too fast (1/30), therefore letting extra light in. Also the ISO (3200) is on the high side, again letting lots of light in. That is if they were the settings at the time. They may be on Auto of course when you fired it up to take these screenshots. So pardon my interference 

This chap, does some really great vids on camera settings :

1 Like
Yes see what you mean now makes sense and thanks for the link gonna take a look now 
Hi Garry (spell your name right this time) 
Sorry was caught in a little work there didnt really explain.
The general rule of thumb when shooting video is to set your shutter speed at twice that of your framerate. So I can see you’ve set your frame rate at 30, so therefore the shutter speed would be set to 1/60 . Again with the ISO, we set as small as possible or as near to 100 as we can to keep the image as crisp and grain free as possible. You cant always stick it on 100 of course, but its whatever setting helps you to get capture those right image(s).
Using some of the above, it will help you set your camera up when next out n about taking vids with your ND filters on.
Im still getting my head around ISO’s/ Apertures and shutter speeds etc so I’d expect someone possibly to correct my terminology and make better sense of what I was trying to say ! LOL.
Failing my blitherings above, there are some fab youtube vids on it. 
2 Likes
You’ll get there Garry. There’s a patch of farm land on the ridgeway that I’ve gone back and forth across many times, each one just tweaking a setting.
1 Like


