Thanks Dave
I’ll try that tomorrow ![]()
I don’t think it will be a wasted exercise - apologies if it proves to be.
Sure - you miss out on a few new features that are in 18 … but I think the majority of the (positive) differences are within Studio.
1 Like
Just a thought on going from 18 to 17.
Any 18 projects you have won’t open in 17 (there was a major structure change).
You can “Backup” the projects for later use when 18 is reinstalled.
Never done this, but you should be able to “export” an 18 project in Premiere XML format (from the Deliver tab) - and (somehow) it should be possible to open that in either 17 or 18.
Resolve specific things won’t get saved, but the timeline edit should save OK. Any colour grading will be hit and miss.
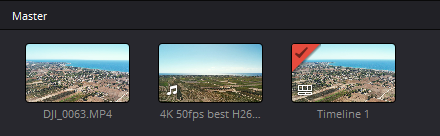
Today was my first foray in DVR so no problem, I’ll just start fresh with 17
Thanks for your help, I’ll let you know how I get on tomorrow ![]()
FWIW, the Speed editor is definitely worth it in my experience, and the DVR Studio license it comes with is perpetual so should do you even for future upgrades.
Using the Speed Editor has made a huge difference to how quickly I can do basic timeline edits of videos for work, especially longer (10 min+) videos.
they stopped giving that free with the studio license.
They stopped the “Speed Editor with Studio” promotion that I managed to get 18 months ago, when the Speed Editor was released - but Studio does still come packaged with the Speed Editor … albeit for a lot more than I paid.

https://cvp.com/product/blackmagic-davinci-resolve-speed-editor
ah ok at 1 point they did stop,unless it was something el;se they were giving free with a licesne
Yeah - it was the initial release of the Speed Editor that came bundled with Studio for the same price as just Studio - that was the deal I got.
1 Like
Well I had exactly the same issue in 17, but… whilst using Filmora (my previous go-to) to create some test files of various res’s, frame rates etc. It told me I needed a new HEVC (H265) codec.
As I could play H265’s in VLC and Filmora I had assumed my codecs were all good.
However after installing a new one from the Microsoft store all my H265 files from the AIR2S now load into DVR 17
So it seems it was my bad, with poor codecs causing the problems. I’ll do some research on features and decide if I stick with 17 or try 18
Thanks for the input guys, your help is appreciated ![]()
Glad you have an operational version. ![]()
1 Like
On the subject of DaVinci Resolve, I am amazed at the functionality of the free version… it does more than I can currently even think about, let alone use. It will be years (if ever) before the functionality I need is hampered by the limitations in the software.
1 Like
I can certainly loose myself for hours (perhaps days, sometimes, with Fusion) playing with just one function and all its sub-settings, and trying them all on different clips, with no proper end project in mind.
I knew there was a page on the Blackmagic site that listed the things in Studio that are not in the free version. Just bumped into it …
1 Like
LOL! I see the latest Reference Manual for Resolve is only 4,020 pages long - a 173MB .pdf
Right. Made a few videos yesterday (nothing special), from the DJI FPV, and Avata mainly (a little vista DVR footage), and colour (or color for those who can’t spell,a nd tbh a youtube search brings better results when you spell it wrong) correcting… Esp how from different times of day video, different quads, etc… I’m not sure my monitors are setup right… Anyways, someone know a “simple” video to get me started. I know that casey guy good with his Davinci tutorials, but something simple for someone who doesn’t really understand it… Or be better to start with photos in gimp rather than video?
I’ve played round with the wheels, etc and watched one or two videos, but not making much sense yet. My videos are too dark!
Colour grading in any software needs an understanding of what even the basic controls do … by which I mean an understanding of the effect they will have on the image so that you can determine which to use by looking at the image, and then working in the right way to get the result that you are looking for.
The biggest problem is that your “desired result” is very subjective - there’s no correct result … beyond whites being white and blacks being black … and, as you say different cameras and times of day provide different stating points.
Likewise, clips that were shot using auto white balance, or auto exposure, can be a nightmare to grade easily (particularly auto WB), since they are both changing your starting point every few frames.
So - with DR or any software - it’s very much a case of trying things, learning what they do and the effect they have, and resetting when you don’t get what you’re after, and trying again.
Video from each cameras often varies from what you want in a similar way - so you can reach, and save, a standard grade that you can use for everything from that camera to get you quickly to a starting point - and then add some more nodes to do the final tweaking.
Taking a quick look at Casey’s catalogue, this vid seems to be a good starting point - but then I don’t know what you already know to point you to a next step.
There is the Auto-Balance that can get some videos close to what you want, but it does depend on a good variety of colours/saturations/contrast to get it close. The downside of using this tool is that you’re not actually learning anything. If it makes things better, for you, use it … if it doesn’t, then undo and go the manual route.
That really doesn’t provide a lot of information … it could be the highlights that are too dark, the shadows that are too dark, the mid-tones that are too dark … or just everything.
Scrolling these wheels (underlined in red - left to darken / right to lighten) adjusts “darkness” in the 4 ways … Offset being everything.
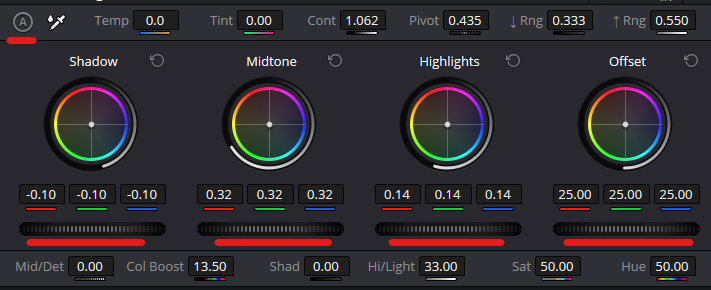
The “A” in the circle, top left, is the “Auto Balance” … much the same as the “Auto Tone” in Lightroom, etc. It’s not instant the first time you use it - it has to load the module (that isn’t used by pro graders) - so wait for it to do it’s thing.
And - all of that ignores the possibility that you’re not shooting in some modified colour space - Log, D-Cinelike - etc. - that need to be handled differently.
With DR, the colour space management is brilliant to get you to a staring point for Log footage.
D-Cinelike can be graded normally. Some people use a LUT as a starting point for this.
But LUTs are another whole area of image manipulation … ![]()
Heh cheers for this, think it’ll take some time and practise, but willing to do so… I guess it’s just dark areas of the videos from the FPV and Avata. Don’t bother looking through entire video (it’s boring), but you can see. Also I never check what format I’m filming in. I’m starting to get to grips with davinci, so next step was make the footage actually look better

(Oh and sound off, the guy who’s plane it was requested the tracks…)
Edit: that screenshot/thumbnail itself shows how dark the trees are
No need it looks like the camera lens is dirty for one thing