Workflow whilst editing video

Resolve is great for several reasons - cost, even for the Studio version, number of available tutorials and the integrated nature of the various modules being three of those reasons.

Adobe products work together, are expensive and on a recurring subscription basis. If you have decided to invest in them though here is a very simple explanation of the workflow:

3 Likes

Hi Suzanne

I’m on the south coast in Christchurch, (I was born in Manchester and have family there tho :slight_smile: only just got into it… I had a quick go just to keep my partner quiet and thought i’d not like it… well his little dji mini 3 has been adpopted by me now and he doesnt get a look in I fell in love with it immediately… I have been using drone footage for marketing for a while but now but actually flying myself brings whole new perspective. Thank you for your content I havent got photography background but I like the way you explain and keep it simple. I’d like to learn more about photograhy and videography with drones. I get very excited about the busienss solutions these bring as thats were my background was in business and solving business process problems… anyway have a great week I’ll be following you :slight_smile: Louise

1 Like

Hi @LStorey, it looks as though you’re quite new here :wave:t2:

Why not nip over to the Introductions page, and say hello properly and tell us a bit about yourself. :+1:t2:

1 Like

PART THREE - Colour Grading in Resolve – the Colour Tab – Tools and Displays

So, before we get to the absolute nitty gritty of what this thread is about - how we take the basic raw footage the drone captures and grade it to achieve a natural, realistic and faithful rendition of what we ourselves saw – we need to look at the tools and displays available to us and how they are used, including what they will do to the image. So today we will look at the 5th Tab on the Bottom Taskbar, the Colour Tab, and demystify what it looks like and what each bit does. You don’t need to know all of it nor use all of it to grade your footage, you can apply small corrections and keep the grading to a minimum just using one or two areas of the Colour Tab and still get great results.

So the 5th Tab on the bottom task Bar, the ‘Colour’ Tab, looks something like this…

Let’s look a bit closer at the screen and what it does… To simplify it we will divide the screen into 3 rows, starting at the top and to the left side we have the Gallery / LUTS and Media Pool tabs, with the Stills and Power Grade folders beneath. Then we have the Timeline window, showing the video at the point that the play head (red line with the upturned triangle on it).

Then to the top right we have the Fusion panel – Fusion is an amazing set of tools that allow you to add many more options, filters, effects and dynamic effects, but needs some proper research, training and practicing before attempting to use.

The middle band of the screen contains thumbnails of the clips used on the timeline and also the timeline bar, showing all the clips in relation to one another – whichever clip the video head is on is the one that will be highlighted in red and have the current frame shown in the Timeline window above. This allows you to select the clip you want to work on, to watch the footage and to move the play head along and around the timeline – something you need to do as the exposure for the video can change throughout the clip, especially if you are flying with your drone on Auto settings.

The bottom third is the tools menu’s that we are going to use to work on our footage, and again this is split into 3, the first third on the left hand side is the area that we will do most of our work in, the next 3rd has a number of features that allow us to make further changes, and the last third on the right gives us the Scopes graphs to see how out changes are affecting the output…

For me the bits I tend to use the most to change settings are the HDR Colour Wheels in the lower left hand area, then the Curves, Colour Warper and the Blur in the middle area, and the Scopes – Parade option on the right hand side. Lets have a look at the options so you know what each bit does, and then we can look at how to actually grade the footage.

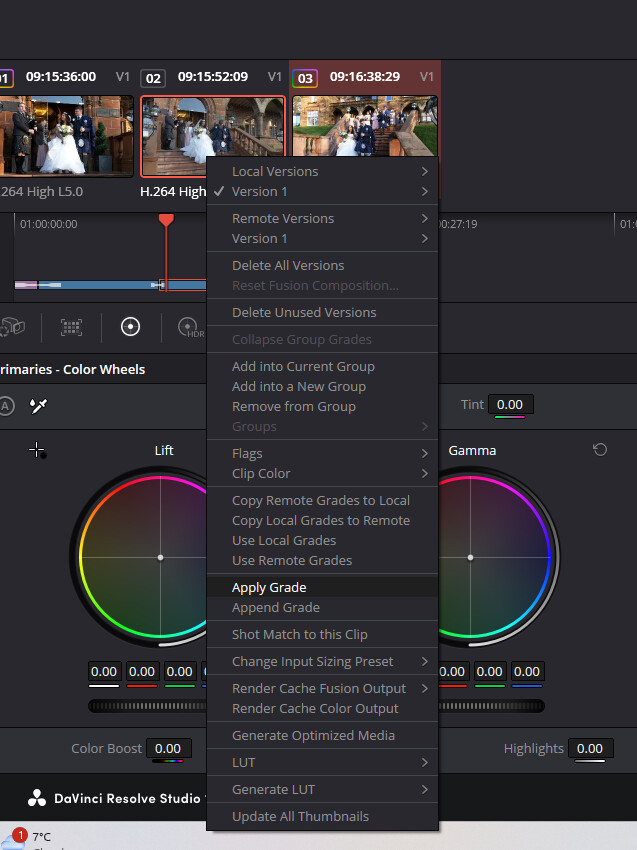
Bottom Left third Tools – Primaries Colour Wheels

The Primaries Tab allows you to make quick changes to the whole image, across the top in the smaller boxes are Temp altering this will add or reduce the temperature, making the image feel warmer or colder. Next is the tint, which I don’t generally use, but could be used to compensate for artificial lighting hues or for adding a tint for an otherworldly feel to a piece. Next is contract, Pivot and Mid/Detail – will smooth the image, + will enhance detail…

The middle row has the actual colour wheels, Lift, Gamma, Gain and Offset. These can be moved individually and incrementally, by moving the central point, by holding your left mouse over an individual colour channel or by using the thumbwheel at the bottom to alter them all at the same time…

Lift will increase or decrease the exposure across the whole image. Gamma will work on the brighter parts of the image and boost or reduce their brightness, Gain works on another range of the image as does offset – the best way to understand these is to have a play with them for yourself and see what it does to the footage.

The lower smaller boxes are Colour Boost – which does as it says – Shadow and Hi Light which will allow you to adjust the brightness of these image area ranges, then Saturation, Hue and L Mix.

Generally I don’t do much on this Tab, but instead concentrate most of my effort on the next Tab, the HDR Colour Wheels.

Bottom Left Third Tools – HDR Colour Wheels

This is the part of the Colours Main tab that I use the most, it allows almost infinite adjustment to each band of brightness of the image – using the left and right arrows you can move from Black to Dark to Shadow to Light, then onto Highlight and Secular, or you can use the Global Wheel to alter all bands at the same time.

Each of the colour wheels allows you to change the exposure and the saturation using the 2 boxes beneath the wheel, and then the central graph of the wheel can be used to move the colour focus of the band and alter the colours – something I don’t generally do.

Beneath the Colour wheels are the smaller boxes that allow you to adjust the overall grades for temperature tint, hue, contrast, pivot, mid/detail and Black Offset, altering these will alter the grading on the whole image.

Bottom Middle Third Tools - Curves

If you come from a photographic background then you may be familiar with the curves tool, which allows you to select the combined or an individual colour channel and then to amend its distribution across the range, dragging the bar upwards at any point will increase the hue and intensity at that point, dragging it downwards will decrease it, fairly simple in principle, but very easy to overdo if you are not careful.

Bottom Middle Third Tools - Colour Warper

The colour warper gives an indication of where your colours are currently sat on the range of colours, and allows you to warp them as a whole in any direction. This will affect both the hue and saturation of the colours, and dragging the point outside of the current marked area will change the image massively.

Bottom Middle Third Tools - Blur/Sharpen tool

The Blur / Sharpen options allow you to enhance the sharpness or reduce it as you need. Generally I will reduce the blur from 50 to between 48 and 46 depending on which drone it was captured with and how the footage looks, The MINI3 Pro needs a little work here, but the AIR3 can come in as oversharp, so a little more blur works. Again, something to play with and see what it does for yourself.

Bottom Left Third Tools – Scopes

The bottom left tool box contains the Colour diagnostics display, which we can use to see the spread and intensity of colours. I tend to prefer the Parade view as it allows me to see the 3 Red, Green and Blue channels individually. As a rule of thumb, the more spread of the range, the better the image will look, this is only an indication though, so look to the main window and rewatch the footage there to check what is happening to the look of the image.

So, we now know where everything is, and can now look at how we grade our footage, which will be in the next gripping instalment!

2 Likes

If you want to get further into colour grading one of the best people to subscribe to on YouTube is Darren Mostyn. He has been using Resolve from the early days and is a certified trainer, a qualification he has to renew with each new release of Resolve. He has also been a professional colourist for 20 years. Based in Brighton so speak English English :slight_smile:

https://www.youtube.com/channel/UC6LqojU1x4LWWhL7QqLB8Mw

1 Like

Yes,I was introduced to his channel the other day by a friend, he knows his stuff, explains it easily and has great results… I have subbed and will be learning more from him as time goes on…

My own workflow works for me, but it is fairly basic, however as folks seem to like the style that I get it is worth sharing it, especially after being asked so nicely…

PART FOUR - Colour Grading in Resolve – how I do it, my workflow and methods…

Now we are fully ready and can find our way around DaVinci Resolve, then we can start to actually grade our footage.

Depending on your technique Colour Grading can be somewhat subjective, especially as we each have eyes that work slightly differently, so what we see and remember may be different to what another sees, which is why it is important to err on the side of caution, as what to you looks natural can be oversaturated and artificial to another – you may get away with it on a photograph, but video is much more revealing.

Also, depending on your display equipment it can be thrown off by an unfaithful rendition, so I always recommend ensuring your computer monitor if as well set up as possible, with natural temperature set up, and that once you have graded and rendered the video you then upload to YT and check it on another screen to ensure you are fully happy, before sharing it with the wider world. For me this means uploading to YT, waiting for it to render up to 4K, and then watching it on our 60” 4K LG UHD OLED TV – which makes the footage look amazing!

So, what do I do to take the footage from basic raw to where I am happy with it…

Once I have the timeline completed, with transitions and intro and exit grahics in place – and any dynamic effects (such as zooming in or out) then I will enter into the Colourr Menu from the bottom Taskbar, the 5th from the left…

I will normally start on the HDR option – bottom LH third of the screen – and the Blur option – bottom middle 1/3rd – and first adjust the Global Exposure and Saturation - generally tweaking these by 0.4 to 0.16.

Next, I will look at the individual wheels, usually boosting exposure on Dark by 0.16 to 0.32 and Shadow by 0.8 to 0.16. And then look at the Highlight and Secular, which I will normally reduce EXP by 0.4 to 0.8 and 0.8 to 0.16 respectively. Once I am happy that I have the detail visible in each band then I will look at the Saturation, and tweak, usually by about +0.4 where needed.

I find small subtle changes work better for me than larger ones, and give a more natural feel.

Next, I will look at overall temperature ad Contract in the lower boxes and adjust until I am happy, and then move onto the BLUR menu – bottom middle 1/3 – and reduce the blur to between 0.46 and 0.49 from the normal setting of 0.50.

Make sure once you are happy with the grading on that part of the clip you then play the rest of the clip, especially if using auto exposure, as any camera movement can cause the auto exposure to change the overall exposure and give you a headache. If this happens, then you can either try and optimise the exposure for the whole clip, or refer to a tutorial such as the ones that Darren Mostyn has on his YT channel - https://www.youtube.com/@DarrenMostyn

Now that you are happy with the first clip, you need to make your changes to each clip, if you want them all to have the same feel then you can use a Sill to capture the settings and then apply this to your other clips. To do this you will need to right click on the viewing window and Grab Still, this will add a still into the Stills1 folder, and you can then drag this onto the other clips to apply the same grading – this may need tweaking or changing radically depending if they were captured on the same day, in the same direction and at a similar time.

Then go back through your clips and check the applied still gives you the right feel, and adjust as needed, and once you think you are happy, then go back to the EDIT menu and watch the video in full. Make note of anything you are not happy with and go back and readjust.

Once fully happy, then render the video using the 7th Menu on the lower Taskbar, and then watch the created file on your computer, and if happy upload to YT and watch on another screen to check for any display irregularities.

Once you are happy, then share it with the world!!

As I said at the start of this thread, I don’t consider myself an expert, I just tweak things to find what works for me, nothing major or difficult, and anyone can do the same as I do and improve their results…

I am still learning where colour grading is concerned – and in using DaVinci Resolve – but as what I do works for me I don’t see a need to change it greatly at this time – perhaps once I have upgraded the MINI3 Pro I will try recording in DCinelog / 10 bit, but until then I am happy enough doing what I do…

Hope this was of some use and not too boring…

Happy for anyone to add to this thread and share their ways of working and tips and tricks, lets make it a resource for all…

1 Like

Suzanne, have you ever altered the speed of the video at all ? I know Resolve is capable of doing this and wondered if this just affects the video timeline or also applies to the audio soundtrack ? ( I’m thinking of perhaps learning some slow motion effects in preparation for my wedding video later bingo the year, probably the bride throwing the bouquet over her shoulder and perhaps the confetti scene as well ) :joy::joy:

Hi John,

Yes altering the speed of the individual clip is firly simple, in the Edit screen select the clip you want and then use the window on the right to select the frame rate or alter the % of the frame rate - I would recommend keeping it to 50% or multiples of the original frame rate, 200%, 300% etc as this will prevent any jerkiness by not having a frame that fits exactly with where it wants to take the frame from.

There are 2 buttons beneath the Frame Rate wheel, clicking one will keep the clip length the same and will then move the rest of the timeline in synch with it - if you dont click it then the length of the clip on the timeline will remain constant, but the clip will run longer thn the footage chosen - so if you have set it to play 30 seconds of a 2 minute clip and then increase the frame rate to 200% it will then stay at 30 seconds timeline but the clip you have chosen will effectively play 1 minute of the footage instead of playing the selected 30 seconds of footage form the clip in 15 seconds real time.

If you want a slow mo effect then set your frame rate fast - 60 fps, 100fps or 120fps and then play back at half or third or quarter speed, so 60fps played at 30fps will effectively give you a half speed on your footage…

Changing the individual clip frame rate does not affect the other clips or the audio track…

I did a flight at the Skye Museum of Island Life, the wind was blowing 30mph, so I flew the AIR3 and kept it moving at a fair speed to combat the wind, unfortunately this meant my clipps were all too fast, so I reduced the clip rate to 30fps, of 50% of the 60fps I recorded in and voila, nice smooth footage :slight_smile:

Hope that helps…

There are several scenarios here …

Video

  • You can drop a clip off one fps onto a timeline of a different fps, and the clip length will be retained and no affect to audio. This will cause frame “twitching”.
  • You can change the clip parameters to the project fps that will use one-frame-per-frame. Depending on whether you change it to a higher/lower fps than it was shot at, obviously the clip will be shorter/faster or longer/slower.
  • You can specify the speed/fps relative to the source fps to any other speed/fps.

Audio

  • You can de-link the video/audio so that any changes to the video clip have no impact on the audio.
  • You can leave them linked and the audio will be playing faster/slower than shot - depending on what changes you’ve made to the video - but there’s an option to retain the pitch. This will mean that small speed changes won’t make things sound higher/lower … but will obviously be shorter/faster or longer/slower.
    Depending on what the original audio is, small speed changes can almost be unnoticeable. Background sounds are far more tolerant of this than speech.

With the video speed changes, there are three options for the clip re-timing.
image
Nearest = Use the closest frames (results in “twitching”)
Frame Blend = when it applies a king of frame-to-frame dissolve that uses the closer frame more than the less close frame
Optical Flow = A VERY processor demanding bit-by-bit recalculation of where “things” should be (That’s a seriously abbreviated description for something that does a really brilliant job … most of the time. Some artefacts can appear.)

Within each of those there is a further Motion Estimation setting …
image

1 Like

Another way to apply grading to other clips, without having to create a still, is to grade one clip, then select all the others you want to apply the same grade to, then right click on the graded clip and select ‘Apply Grade’. Once applied to all clips they can then be individually tweaked if required.

1 Like

… select the clips you want to grade, and middle-mouse-button click the clip with the grading you want them to adopt.

I find that quicker.

So many ways to skin a cat in DR. :wink:

2 Likes

Absolutely! Just tried that and it’s slightly faster :+1: I need more tips like this one to bring down my video editing times lol :+1:

1 Like

Sorry Ozone, you’ve completely lost me there. I simply want to achieve a slo-mo effect to certain clips within the timeline. I only wondered how this affects the audio timeline . I’ll fire me computer up later and experiment a bit and see what works. I’m after the simplest way of achieving this without going into valley the various settings/ methods ( I want things nice n simple) :wink::wink:

I’ve seen HUNDREDS of quick-tips.

Remembering them is my biggest issue!

:rofl:

It doesn’t unless the video and audio clips are linked. I often slow down walking shots in my wedding videos or a veil blowing in the wind. In the edit tab, I right click on the clip and select ‘change clip speed’ I then change 100% to 50% or 25%.

Ahh, thanks for that John :wink::wink:

Just out of interest what fps setting is best to capture the parts I’d want to slow down? Say I was filming at 30 fps, would it perhaps be better to film the parts I wanted to slow down to say 60fps and slow this bit down during processing ? Or would it be pertinent to film it at 30fps same as the rest ?

Keep it in multiples … so 60fps (for half speed) or 120fps (for quarter speed).

1 Like

When we film weddings, we film the run n gun stuff we want slowed down at 50fps, then change the speed to 50% which then matches our 25p timeline. Makes for really slow smooth footage.