Want to print something really big ?

Want to print something really big ?
Printing a case for Sachas Mobula 7 on my ancient Anet A8 wooden printer.

Thank fuck for silent stepper motor drivers ![]()
Thats why it’s in the shed. ![]()
![]()
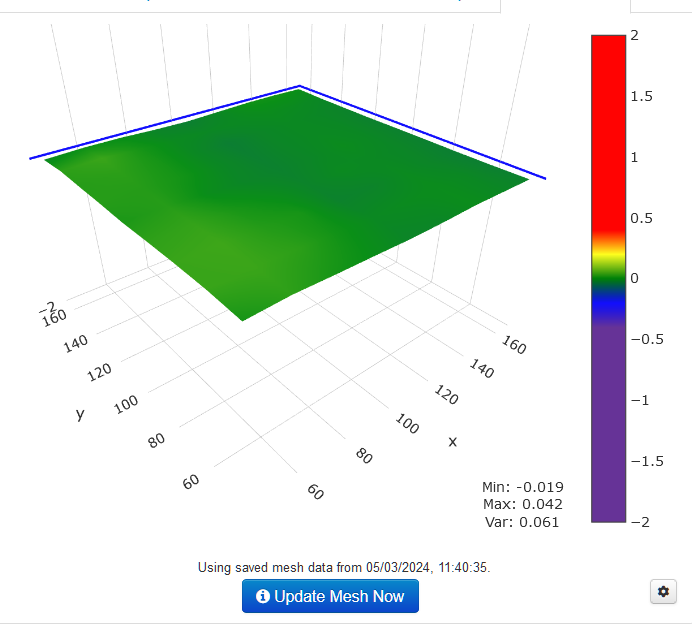
Hmm. Went for the magnetic one in the end. It seems fine so far. ![]()
I ditched my glass for magnetic when I got the Ender3, quite happy with it ![]()
anyone running klipper? (just a general wondering)
the best thing that I like on my highly altered cr10s style printer is the e3d revo nozzles… quick change between 0.25, 0.4 and 0.6 nozzles, with direct drive extruder and 700w mains powered heated bed… gets up to temp in seconds
glass bed here, but one of the coated ones, works well
Vote for Klipper here, Running on a Pi 3 - Octoprint + Klipper but i haven’t really got to tuning it that much. Printer is a FLSun Q5 Delta Printer with many changes.
When i switched it to Direct Drive I made it so that i can take the whole extruder unit out so one unit with 0.6 nozzle and one with 0.2. I should consider the Revo though as that would be far simpler ![]()
Test stream
New firmware and new octoprint install

This looks really useful, The app works OK,
My Creality slicer flags up errors but model seems to be OK. I’ll print one and report back ![]()

Does look like a good app. Only watched halfway. As didn’t need to spend five minutes of him deciding what his printer settings were going to be. ![]()
Ok, so i am at my wits end.
Ender3 v2 neo, Sunlu pla, standard Ender3 profile
Printer starts skipping when extruding, (has worked without issues for a loooong time) resulting in under extrusion
I have tried
I am now at a loss. Other than a new roll of Filament, does anyone have an idea¡
I’d of tried that first personally.
Yea, i was thinking that as i typed it ![]()
The only time ive had skipping is when I’ve had a blockage or the spring tension low
spring tension… or are you sure the filament is getting up to temperature
I have never had a good run with the Swiss bits as I suspect that the stainless needed a lot more heat in the nozzle for the filament to melt.
Yup, upped the spring tension as far as it goes with the same problem, even with a new roll of Filament as well as a different known good roll.
I tried printing up to 20 degrees hotter than normal with no real improvement (upping by 5 degrees at a time)
Even tried a new thermistor & heater seeing i had them to hand.
It does take a little longer to occur with the swiss hotend but once it starts that is the end of the print job.
Have a genuine hotend on order, lets see if it makes a difference. Fingers crossed.
Can’t remember for the life of me why the swiss hotend was consigned to the junk drawer other than i Can’t have been happy with it at the time.
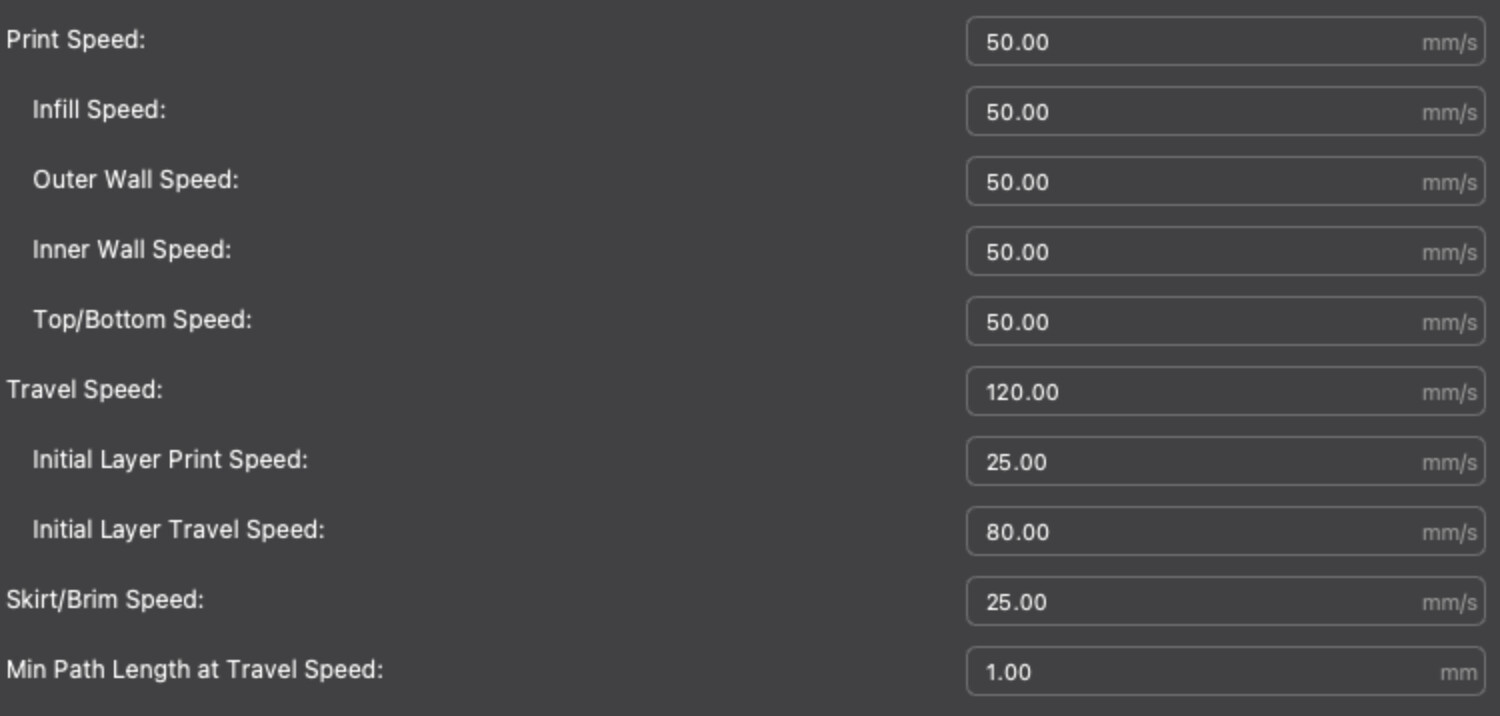
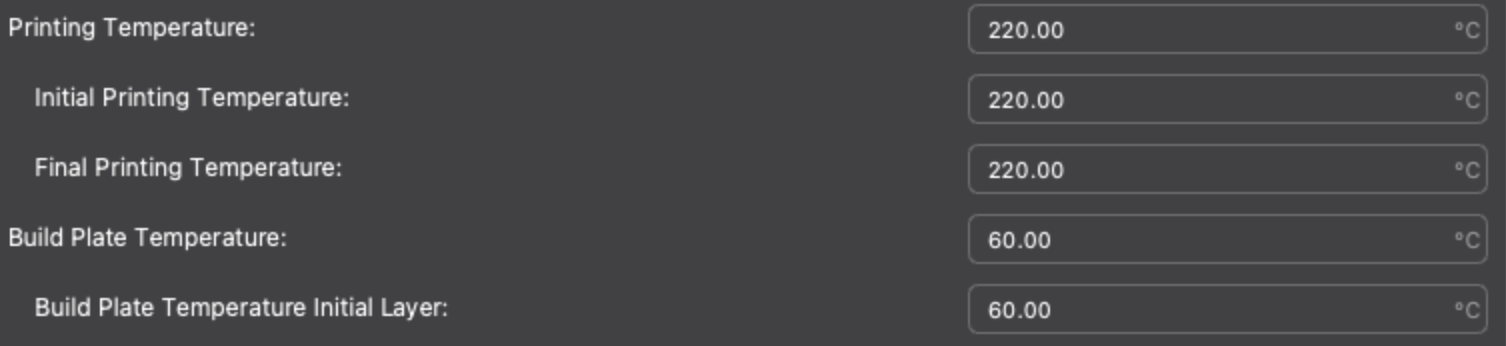
The settings below are from Creality 3D Print for the “Ender3 v2 Neo” for generic PLA.
Don’t know if they’ll help but might be worth a try.
Only other thing I can think of is your extruder may need calibrating
If you’re having problems with under- or over-extrusion, there’s a possibility that your extruder’s E-steps aren’t calibrated. In order to find the right E-steps, you’ll have to do a little bit of math. Using a simple formula, you can calculate the new E-step with only three inputs.
Before starting, make sure that you’re able to navigate to “Control > Motion” on whichever Ender 3 you have. Some users have noted that this option is missing, perhaps due to the status or version of their firmware.